Day31 #90DaysOfDevOps Minikube on AWS & kubeconfig Files &YAML (Deployment and Service)


Why Set Up Minikube?
Before we begin, you might be wondering why it’s essential to set up Minikube. Well, Minikube provides an excellent environment for learning and experimenting with Kubernetes without the need for a full-scale cluster. It’s perfect for developers and enthusiasts who want to get hands-on experience with Kubernetes in a controlled environment.
Prerequisites
To follow along with this tutorial, you’ll need the following:
An AWS account (if you’re setting up on an AWS instance).
Basic knowledge of AWS and Linux terminal commands.
Let’s get started!
Setting Up Minikube on AWS Instance
Here, I am creating an EC2 Instance to set up minikube on the server. If you are comfortable setting up minikube on your local then feel free to jump on the minikube setup.
Enter the name of the machine and select the Ubuntu22.04 AMI Image.
Select t2medium along with 2 CPU core.
Create a new key pair.
Open Port 22 and rest leaf it.
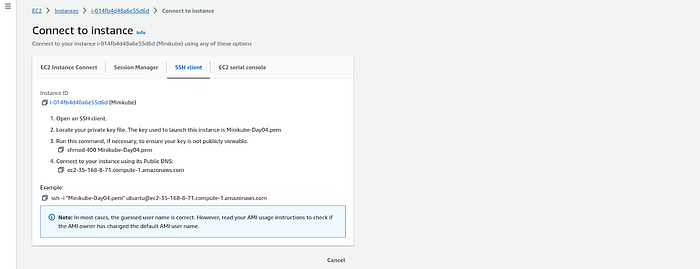
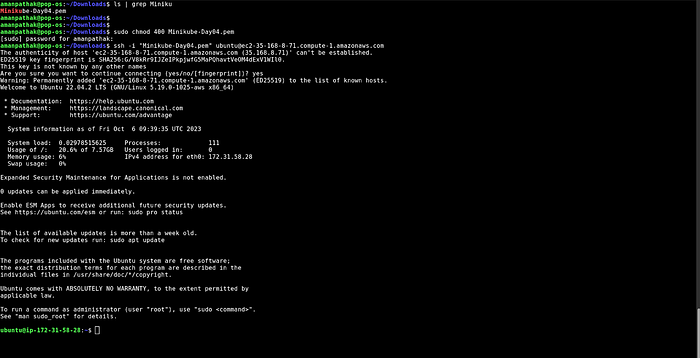
Now, go to your Downloads folder or where you have downloaded your pem file and change the permission by running the command ‘chmod 400 <Pem_file_name>

Now, connect your instance by copying the given command below.
Now, run the following commands to install Minikube on your local machine or AWS machine.
sudo apt update -y && sudo apt upgrade -y
sudo reboot
After 3 to 4 minutes, reconnect with the instance through ssh
sudo apt install docker.io
sudo usermod -aG docker $USER && newgrp docker
sudo apt install -y curl wget apt-transport-https
curl -LO https://storage.googleapis.com/minikube/releases/latest/minikube-linux-amd64
sudo install minikube-linux-amd64 /usr/local/bin/minikube
minikube version
curl -LO https://storage.googleapis.com/kubernetes-release/release/`curl -s https://storage.googleapis.com/kubernetes-release/release/stable.txt`/bin/linux/amd64/kubectl
chmod +x kubectl
sudo mv kubectl /usr/local/bin
kubectl version -o yaml
minikube start - vm-driver=docker
Now, to verify the installation you can run the given command and if you get the result in the snippet then your installation is completed.
minikube status

You can also validate your kubectl version by running the command.
kubectl version
Now, run the given command after 4 to 5 minutes which will show the nodes.
kubectl get nodes

Creating Your First Pod
vim test.yml
kind: Pod
apiVersion: v1
metadata:
  name: testpod
spec:
  containers:
    - name: c00
      image: ubuntu
      command: ["/bin/bash", "-c", "while true; do echo Hello-Kubernetes; sleep 5 ; done"]
    - name: container2
      image: ubuntu
      command: ["/bin/bash", "-c", "while true; do echo Second Container is still running; sleep 3 ; done"]
  restartPolicy: Never
Deploying the pod
kubectl apply -f test.yml
List the Pods
kubectl get pods
Check Logs:
kubectl logs -f pod1
To check the logs of the primary container, specify the container name:
kubectl logs -f pod1 -c container1
To check the logs of the second container, specify the container name:
kubectl logs -f pod1 -c container2
Delete the Pod:
kubectl delete pod pod1
To list the IP of the pod, use the below command.
kubectl pod pod1 -c container1 — hostname -i
To delete the pod by specifying the manifest file name
kubectl delete -f test.yml
KubeConfig Files
1. Kubeconfig Files:
Purpose: Think of a kubeconfig file as your passport to the Kubernetes kingdom. It contains all the authentication information you need to interact with the cluster, including cluster details, user credentials, certificates, and context.
Content: This YAML file stores information like the API server address, your username and token, and the specific context you’re using to access the cluster.
Usage: Your kubectl command-line tool relies on the kubeconfig file to identify the target cluster and establish a secure connection. You can store it in the default location (~/.kube/config) or specify its path using the KUBECONFIG environment variable.
apiVersion: v1
kind: Config
clusters:
- name: my-cluster
  cluster:
    server: https://api.example.com
    certificate-authority-data: <ca-data>
users:
- name: my-user
  user:
    client-certificate-data: <client-cert-data>
    client-key-data: <client-key-data>
contexts:
- name: my-context
  context:
    cluster: my-cluster
    user: my-user
    namespace: my-namespace
current-context: my-context
In this example,
apiVersion and kind define the resource type.
clusters specifies the clusters with its server and URL and Certificate Authority(CA) data. Here we have to define the server link or Kubernetes API Server of the Kubernetes cluster. So, when we run any command using kubectl then kubectl interacts with the given link or Kubernetes API Server of the Kubernetes cluster.
users specify the users with their client certificate and client key name. So, only authorized users can access the Kubernetes cluster.
contexts specify the cluster, user, and namespace information that has been defined above. You can create multiple contexts and switch between any different clusters at any time.
current-context specifies that on which cluster the command should run. If you set the current-context one time then you won’t have to specify again and again while running the commands.
2. Services:
Purpose: Services act as your application’s public face within the Kubernetes landscape. They provide a stable access point for pods belonging to your deployment, handling load balancing and network routing.
Content: Service files specify details like the service name, type (e.g., LoadBalancer, NodePort), and selector that identifies the pods it should route traffic to.
Usage: Developers use services to expose their applications internally within the cluster or externally to the outside world. This allows independent scaling of pods without changing how users access the application.
apiVersion: v1
kind: Service
metadata:
  name: my-app-service
spec:
  selector:
    app: my-app
  ports:
  - protocol: TCP
    port: 80
    targetPort: 8080
3. Deployments:
Purpose: Deployments act as your automated deployment managers, controlling the desired state of your application within the cluster. They manage pod replicas, update strategies, and roll out new versions of your application.
Content: Deployment files define parameters like the number of replicas, container image and resources, pod template with environment variables, and update strategy (e.g., rolling update).
Usage: Developers use deployments to automate the process of deploying, scaling, and updating their applications in a controlled and predictable manner. This ensures seamless rollouts and minimizes downtime during updates.
apiVersion: apps/v1
kind: Deployment
metadata:
  name: my-app
spec:
  replicas: 3
  selector:
    matchLabels:
      app: my-app
  template:
    metadata:
      labels:
        app: my-app
    spec:
      containers:
      - name: my-app-container
        image: my-app-image:latest
Finally we have completed Day 31
I hope you learned something from this blog. If you have, don’t forget to follow and click the clap 👏 button below to show your support 😄. Subscribe to my blogs so that you won’t miss any future posts.
If you have any questions or feedback, feel free to leave a comment below. Thanks for reading and have an amazing day ahead!
Stay connected on Linkedin
Know about my Projects